APPLE COLOR at LACFPUG

About 6 months after making this purchase, Apple announced the inclusion of Final Touch with Final Cut Studio 2 under the name Apple Color at the 2007 NAB show in Las Vegas. Yeesh, that was a long sentence :). The version that Apple included as part of the FCS2 package was the 2K ($25,000!) version. Pretty nice for a $1200 Final Cut package.
While this announcement was broadly lauded as a great thing, there were those that cautioned the casual user that this application was not for the faint of heart. And, indeed, the application's interface is not what the typical FCP / Mac user is used to dealing with. The application has a great deal of complexity associated with it.
Moreover, casual users were also warned that Color would not be effective unless it was used in an environment that was conducive to professional level color grading tasks (i.e. using a control surface, using a dedicated room with the walls painted 15% gray, all lighting in the room properly placed and color balanced to 6500K...).
Clearly, that is the ideal. However, good results can be achieved without going to all of these extremes. The demonstrations at last night's LAFCPUG meeting illustrated that very nicely. Now, with all of that being said, on with the show!
First up was Andrew Balis who showed us a very slick couple of tricks in Color. He took some footage of a man sitting on a couch. Just a short clip that showed him looking from left to right. Andrew then illustrated key frames in Color.
He set a keyframe and then desaturated the image. He set another keyframe and reset the desaturation settings. Then he was able to show the footage gradually shift from color to B&W. He then showed that if you cross the keyframes, the process that was keyframed works in reverse (i.e. move the second keyframe so that it occurs before the first keyframe).
Very slick stuff!
Andrew then illustrated some tricks with keying and keyframes. Andrew selected the man's shirt in the shot as the key color (he set a range of color around the shirt's base color). This did cause some items in the BG to get keyed as well but Andrew assured us that the shirt could be masked to prevent this.
Once Andrew had his key pulled, he set a group of keyframes so that as the man in the shot turned his head, his shirt would change colors. Color defaults to an "ease in / ease out" type of keyframe by default and this default was not appropriate for this particular effect. Andrew quickly adjusted the type of transition between keyframes, quickly added some more keyframes to smooth the motion and played it all back. The effect was very compelling.
Andrew also demonstrated some undocumented features of the keyframing interface that were very nice. Andrew covers all of these techniques in his upcoming "Color grading in Color" training DVD that will be available from Ripple Training soon.
Next up were 3 folks from Hollywood-DI. Managing Director Neil Smith, senior colorist Yasu Tsuji and DI supervisor, Aaron Peak. Neil introduced the company as well as Yasu and Aaron. Yasu and Aaron then performed a demo of Color using footage for a Mercedes Benz commercial that was shot on a Viper camera in Filmstream mode.
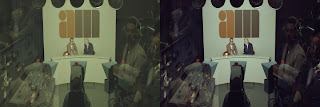
As a quick aside, the Viper HD camera has a sepcial mode called Filmstream that ouputs the raw sensor data with no filtration or color balancing. The images that are produced in this mode have a slight greenish cast and soft contrast. In the following images from David Fincher's Zodiak (which was shot on a Viper in Filmstream mode), the left hand image is the raw and the right hand one is the color corrected image:
The first thing that Yasu and Aaron demonstrated was a simple FCP to Color workflow. They suggested that you take your sequence and render it out to QT and then bring that into a new sequence in FCP. Once you have that sequence set up, use the File->Send To->Color command (assuming that your sequence is the currently highlighted item in the timeline).
Once in Color, the first tab is opened up for you and allows you to setup your project settings. Color is structured such that you go from left to right on the tabs or "rooms" as you progress through your project. Once the project settings were adjusted and confirmed, they moved on to the primary room.
In the primary room, they corrected the green cast and the low contrast of the Viper footage and then saved that look so that it could be quickly applied to subsequent clips. One might think of the primary room in Color as the coarse tuning and overall look for your project while the secondary room allows for more precise tuning and color grading.
Once the primary viper look was defined, they moved on to the secondaries and fine tuned the color on the clips. Part of the footage was of a 50s drive in and a shot looking through the windsheild of a Mercedes Benz with a couple talking in the car.
Color allows for the creation of vignettes in the secondary room to isolate specific areas of a shot so that you can apply grading to areas that fall within the vignette as well as outside of the vignette. Color allows for the use of square and oval shapes for this as well as user defined shapes using B-splines. Color also allows for the definition of a soft edge on the vignette so that the masking effect is less noticable in the shot.
These user defined shapes are managed in the Geometry tab of color where you can easily modify the shapes, define the softness characteristics of the shapes and load and save them as well. The standard square and circular vignette shapes are edited on the secondary panel.
A user-defined vignette was created for the diner scene that allowed them to brighten and color the area outside of the diner where the patrons were milling around. This allowed them to focus the viewer's attention to this area of the scene.
The car scene was corrected with a reduction in luma for the overall look of the scene. However, this darkened the interior of the car with the couple such that it made them hard to see. They created another custom vignette shape for the interior and boosted the luma and adjusted the color for flesh tones and contrast so that the couple stood out more in the scene.
Following this, they then keyframed the vignettes so that they would stay in their appointed spots in the shots as the camera trucked in to the shot and dollied to the side slightly.
All of this was done VERY quickly and color was able to provide real-time feedback. Considering that this was done on a Macbook Pro at the meeting, the power of Color on such a small system was very impressive.
Once the final touches were applied, Yasu took the role of Director and told Aaron that he was not quite pleased with the look of one of the shots. Aaron complained that he had already put a lot of work into the grading but Yasu, as any good director would do, opined that he did not care and Aaron aquesced and altered the look of the car interior shot to have a somewhat surreal sci-fi look to it.
At this point, they had Color render the final graded footage and then used the Send-to function and brought the finished product back into FCP.
All in all, a very impressive demo done by a very talented team of colorists who demonstrated the tools in a very approachable manner and gave us all a few good laughs.
If you are interested in more info on Apple's Color, Wendy Gribble has a nice tutorial over at Ken Stone's site for setting up node trees. You can see it HERE.

Comments
The integration of Color with FCP right now sounds like it's a bit of a joke, if this is what users are having to resort to. I think I'll be avoiding it, at least until I can do a roundtrip a la Motion or STP.
The idea being, that if you have several layers of video stacked on top of each other, render it, and replace it with the rendered version.
That way the timeline isn't messy when imported into Color. I don't think Color can handle more than a few video layers in a timeline and it can get overly complex.